Get started with optimization
Get started with optimization
Optimization takes a set of jobs and resources and quickly creates a valid schedule that takes into account specific job requirements, resource suitability to carry out the work, and can also take travel time into account.
There are three main ways of creating an optimized schedule using Skedulo’s optimization feature:
- Optimize on the scheduling swimlane.
- Create a recurring optimization run using the Optimization schedules settings page.
- Remotely optimize work using the
/optimizationAPI.
This section provides tutorials for each of these optimization strategies.
Permission requirement
Only users withAdministrator or Scheduler permissions are able to schedule work.
About these tutorials
These tutorials demonstrate optimization using a Skedulo organization, but the process of optimizing work is the same for Skedulo for Salesforce organizations.
They are designed to get you familiar with the different ways you can use optimization in Skedulo and are fairly basic. For more detailed information about our API, see the API documentation, or the other relevant sections of this chapter.
Optimize on the swimlane
Optimizing jobs on the swimlane is best suited to smaller optimization runs.
The amount of time it takes for optimization to find a scheduling solution for the jobs you want to optimize will depend on the number of jobs included in the request, but should not take longer than a few seconds.
In this tutorial, we are going to schedule 10 jobs with a balanced workload between three resources over one day on the swimlane. We will keep it simple by not setting any specific tags or time constraints, but we will take travel time between the resources home addresses and the job locations into account.
Before you start
You should already be familiar with the Skedulo web application and how to create jobs, resources, and availability.
-
You will need to have already set up some resources in your organization who have availability for the day you want to schedule. Make sure all of the resources have the same region and that they have a home address.
-
You will also need to have at least 10 jobs created for the region where your resources are allocated. These jobs should all have addresses, but no start times or constraints.
-
In the Skedulo web application, to go the swimlane view under Schedule -> Swimlane.
-
Click Region in the filter bar and select the region where you have created your jobs to be optimized and resources.
-
Choose the day you want to schedule the jobs from the date picker above the swimlane.
-
Select Day from the drop down menu in the upper-right part of the schedule view to only display that day.
-
Select the 10
Queuedjobs that you want to schedule using optimization from the list on the left. -
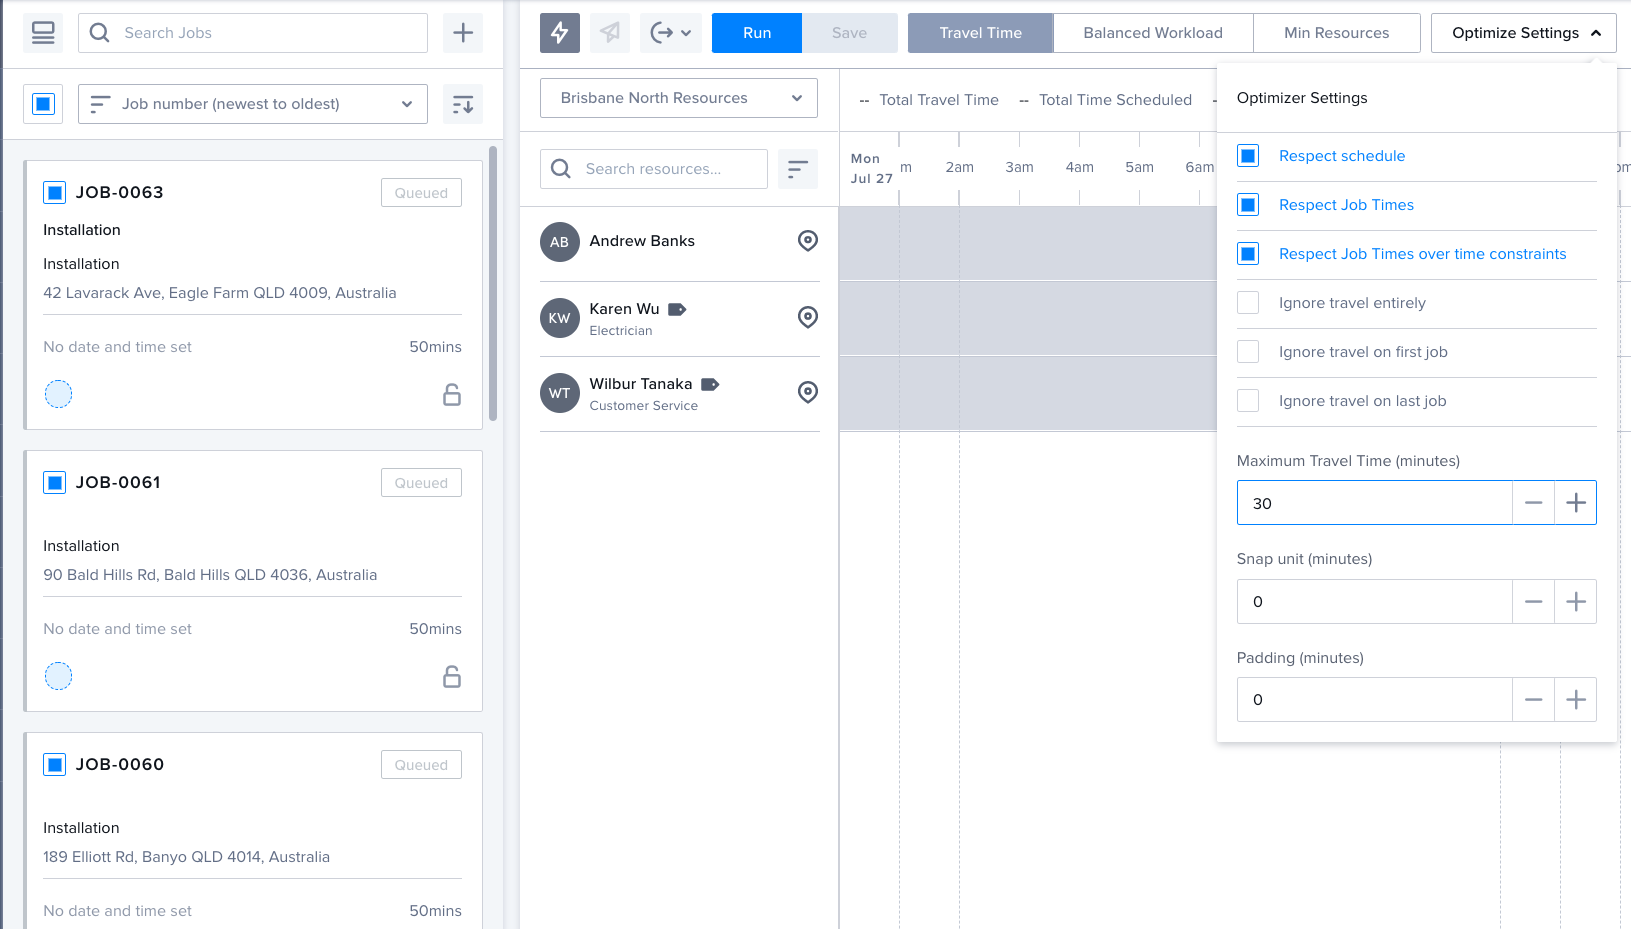
Click the lightning Optimize button in the upper-left part of the schedule to open the optimization options.
-
Select Balanced Workload from the optimization menu bar, then click the Optimization Defaults and add a
Maximum Travel Timeof 30 minutes. The other default optionsRespect schedule,Respect Job Times,Respect Job Times over time constraintsshould also be enabled.
-
Click Run, then wait for the optimization to complete. This should take about 15 seconds.
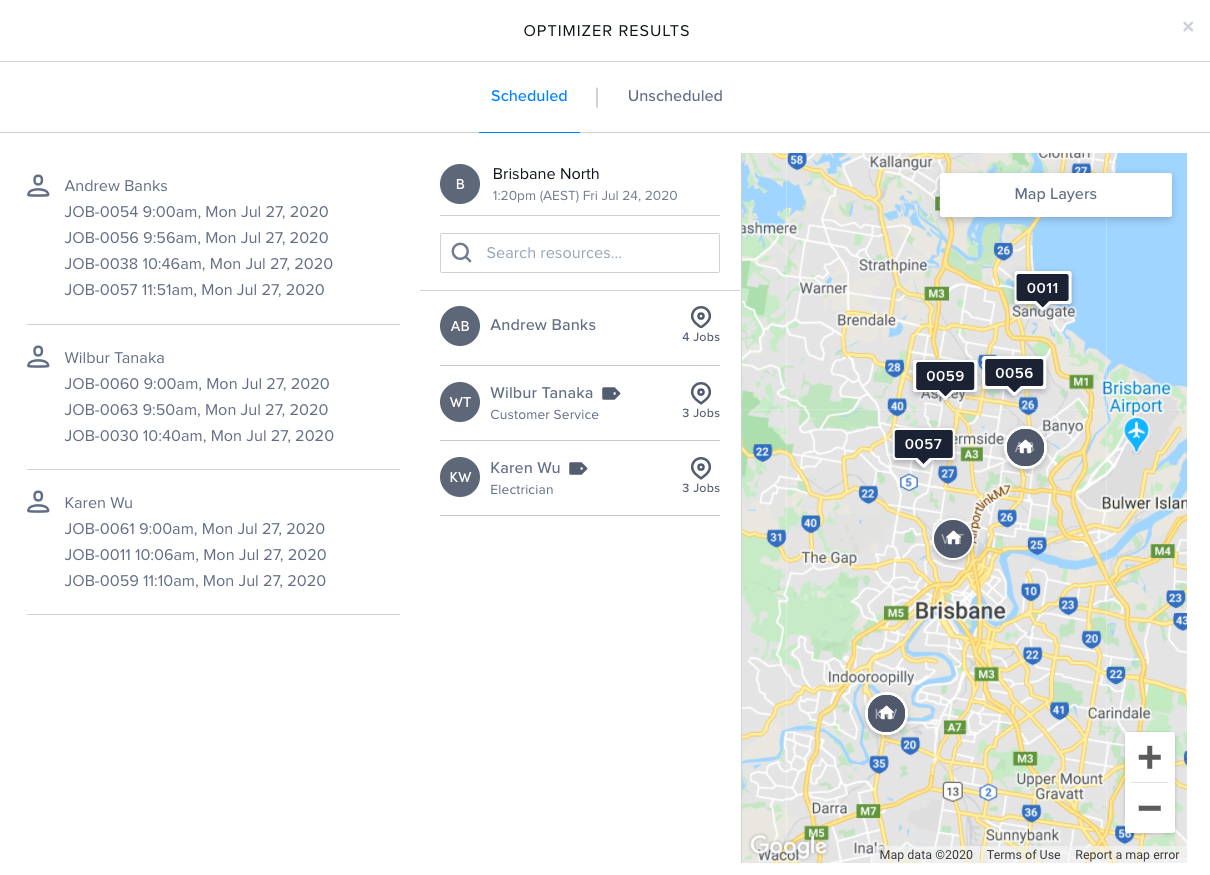
When the optimization is complete the following summary is displayed showing the jobs assigned. If there are any jobs that have not been allocated, they are shown in the Unallocated jobs tab.

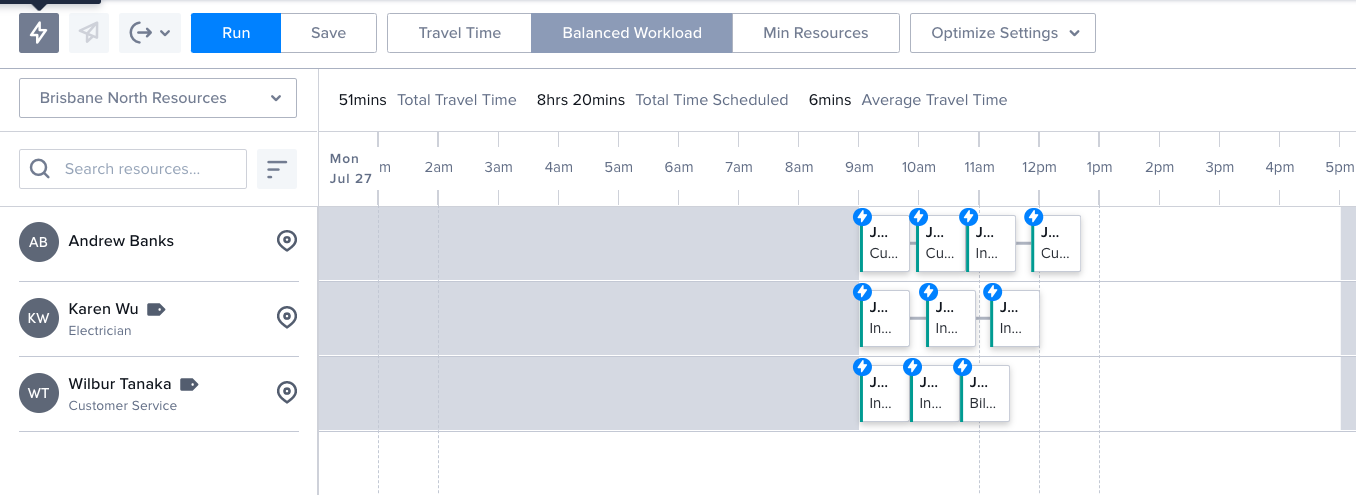
The scheduled work is shown on the swimlane:

-
Click Save to schedule the jobs.
The jobs are now scheduled and Pending Dispatch.
Schedule a batch optimization using the Skedulo web application
Optimization schedules can be used to run larger optimization queries over longer periods of time to yield better results.
In this tutorial, you will create a recurring optimization using the Optimization schedules settings page.
You will use a combination of the basic and custom setting to configure an optimization request that creates a schedule for all Queued jobs each day at 5PM to be scheduled two days in advance. e.
Before you start
-
Some basic understanding of EQL filters is required to use the custom settings for batch optimization requests.
See the EQL filters documentation for information about using EQL filters in queries.
-
Create 10 jobs with addresses but without any scheduled start date or time or any other time constraints.
Part 1: The basic optimization schedules settings
In this part you will set up the basic configuration options to run the query starting at 5PM on the current day to create a schedule for a day two days in advance.
- In the web app, go to Settings -> Optimization schedules.
- Provide a name for your optimization schedule.
- Set the timezone for the region where your jobs are located.
- Select the current day as the
Run date. - Schedule the optimization to run at 5PM.
- Use the default scheduling settings.
- Set the
Date rangeto1day. - Select the date two days from the current date as the
First scheduling window. This sets the offset, the number of days in advance that the schedule is being created, to two days.
Part 2: Use EQL filters to select jobs and resources to be included in the request
In this part you will use the custom setting to select the jobs and resources you want to include in the query using EQL filters.
-
On the Edit optimization schedule page under Jobs, select Custom.
-
Enter the following custom filter string in the box provided:
JobStatus == "Queued"This EQL filter selects all jobs that have a
Queuedstatus. -
Under Resources, select Custom.
-
Enter the following custom filter string in the box provided:
EmploymentType == "Full-time"This EQL filter selects all resources that are
Full-time. -
Check the box to
Make optimization recurring, then select the following options:- Repeat
Daily. - Every
1days. - Ending
On. - Then select a date one month from now.
- Repeat
-
Click Save to save the recurring optimization.
The Batch optimization page now shows the optimization is scheduled to run daily, with the next run today at 5PM.
Create a batch optimization schedule using the /optimization API
The new /optimization endpoint accepts the same payload as /planr with the added ability to create a batch optimization schedule using /optimization/batch/schedule.
In this tutorial you will use the optimization API to create a batch optimization query that schedules all Queued jobs each day at 5PM to be scheduled two days in advance.
Before you start
-
Some basic understanding of EQL filters is required to use the custom settings for batch optimization requests.
See the EQL filters documentation for information about using EQL filters in queries.
-
Create 10 jobs with addresses but without any scheduled start date or time or any other time constraints.
-
Using your preferred REST API client or curl, submit a
POSTrequest tohttps://api.skedulo.com/optimization/batch/schedulewith the following payload:{ "name": "Brisbane", "jobQuery" : "JobStatus == \"Queued\"", "resourceQuery" : "EmploymentType == 'Full-time'", "region" : "00030443-08b8-4612-a55a-75cb600e2729", "runDate" : "2020-07-29", "timezone": "Australia/Brisbane", "earliestStartTime" : "17:00:00", "dayRange" : 1, "dayOffset" : 2, "recurring" : { "step" : 1, "repeatMode" : "daily", "endAfterNumberOccurrences" : 1, "repeatOnWeekDays" : [ "sun", "mon", "tue", "wed", "thu", "fri", "sat" ] } }The successful request returns an ID for the batch optimization schedule. You can use this ID to check the details of the optimization request.
-
Submit a
GETrequest tohttps://api.skedulo.com/optimization/batch/schedule/{schedule_id}, replacing the{schedule_id}with the ID returned in the previous step.This returns the details of the batch optimization schedule that you created in step 1.
{ "name": "Brisbane", "jobQuery": "JobStatus == \"Queued\"", "resourceQuery": "EmploymentType == 'Full-time'", "region": "00030443-08b8-4612-a55a-75cb600e2729", "runDate": "2020-07-29", "timezone": "Australia/Brisbane", "earliestStartTime": "17:00:00", "latestEndTime": null, "dayRange": 1, "dayOffset": 2, "recurring": { "step": 1, "repeatMode": "daily", "endAfterNumberOccurrences": 1 }, ... "lastModifiedByUserId": "000154e2-4a1f-45c9-842f-ca23d8f9f18c", "lastModifiedByDate": "2020-07-29T03:18:24.831313Z", "createdByUserId": "000154e2-4a1f-45c9-842f-ca23d8f9f18c", "createdByDate": "2020-07-29T03:18:24.831313Z" } -
Open Settings -> Optimization schedules in the Skedulo web app to view the new batch optimization in the list of recurring optimizations.
Feedback
Was this page helpful?